


Implementing JWT authentication in Laravel
Implementing JWT authentication in Laravel
JWT authentication demo
Now, let’s take a look at how to implement JWT authentication in Laravel 9. The full code for this project is available on GitHub. Feel free to fork and follow along.
Prerequisites
This tutorial is designed as a hands-on demonstration. Before getting started, ensure you’ve met the following requirements:
Install Laravel 9
We’ll get started by creating a new Laravel 9 project.
Install and navigate to the new Laravel project using these commands:
composer create-project laravel/laravel laravel-jwt
cd laravel-jwt
Create a database
Create a MySQL database named
laravel-jwt. For this demo, I’m using XAMMP, but any database management system will suffice.Connect to the database
To allow our Laravel application to interact with the newly formed database, we must first establish a connection. To do so, we’ll need to add our database credentials to the
.envfile:DB_CONNECTION=mysql DB_HOST=127.0.0.1 DB_PORT=3306 DB_DATABASE=laravel-jwt DB_USERNAME=root DB_PASSWORD=Make the migrations
The
Usertable migration comes preinstalled in Laravel, so all we have to do is run it to create the table in our database. To create theUsertable, use the following command:php artisan migrateInstall and set up JWT
Now that our database is set up, we’ll install and set up the Laravel JWT authentication package. We’ll be using
php-open-source-saver/jwt-autha fork oftymondesign/jwt-auth, becausetymondesign/jwt-authappears to have been abandoned and isn’t compatible with Laravel 9.Install the newest version of the package using this command:
composer require php-open-source-saver/jwt-authNext, we need to make the package configurations public. Copy the JWT configuration file from the vendor to
confi/jwt.phpwith this command:php artisan vendor:publish --provider="PHPOpenSourceSaver\JWTAuth\Providers\LaravelServiceProvider"Now, we need to generate a secret key to handle the token encryption. To do so, run this command:
php artisan jwt:secretThis will update our
.envfile with something like this:JWT_SECRET=xxxxxxxxThis is the key that will be used to sign our tokens.
Configure AuthGuard
Inside the
config/auth.phpfile, we’ll need to make a few changes to configure Laravel to use the JWT AuthGuard to power the application authentication.First, we’ll make the following changes to the file:
'defaults' => [
        'guard' => 'api',
        'passwords' => 'users',
    ],


    'guards' => [
        'web' => [
            'driver' => 'session',
            'provider' => 'users',
        ],

        'api' => [
                'driver' => 'jwt',
                'provider' => 'users',
        ],

    ],
In this code, we’re telling the API
guardto use the JWTdriverand to make the APIguardthe default.Now, we can use Laravel’s inbuilt authentication mechanism, with
jwt-authhandling the heavy lifting!Modify the
UsermodelIn order to implement the
PHPOpenSourceSaverJWTAuthContractsJWTSubjectcontract on ourUsermodel, we’ll use two methods:getJWTCustomClaims()andgetJWTIdentifier().Replace the code in the
app/Models/User.phpfile, with the following:namespace App\Models; use Illuminate\Contracts\Auth\MustVerifyEmail; use Illuminate\Database\Eloquent\Factories\HasFactory; use Illuminate\Foundation\Auth\User as Authenticatable; use Illuminate\Notifications\Notifiable; use PHPOpenSourceSaver\JWTAuth\Contracts\JWTSubject; class User extends Authenticatable implements JWTSubject { use HasFactory, Notifiable; /** * The attributes that are mass assignable. * * @var array<int, string> */ protected $fillable = [ 'name', 'email', 'password', ]; /** * The attributes that should be hidden for serialization. * * @var array<int, string> */ protected $hidden = [ 'password', 'remember_token', ]; /** * The attributes that should be cast. * * @var array<string, string> */ protected $casts = [ 'email_verified_at' => 'datetime', ]; /** * Get the identifier that will be stored in the subject claim of the JWT. * * @return mixed */ public function getJWTIdentifier() { return $this->getKey(); } /** * Return a key value array, containing any custom claims to be added to the JWT. * * @return array */ public function getJWTCustomClaims() { return []; } }That’s it for our model setup!
Create the AuthController
Now, we’ll create a controller to handle the core logic of the authentication process.
First, we’ll run this command to generate the controller:
php artisan make:controller AuthControllerThen, we’ll replace the controller’s content with the following code snippet:
namespace App\Http\Controllers;
use Illuminate\Http\Request;
use Illuminate\Support\Facades\Auth;
use Illuminate\Support\Facades\Hash;
use App\Models\User;

class AuthController extends Controller
{

    public function __construct()
    {
        $this->middleware('auth:api', ['except' => ['login','register']]);
    }

    public function login(Request $request)
    {
        $request->validate([
            'email' => 'required|string|email',
            'password' => 'required|string',
        ]);
        $credentials = $request->only('email', 'password');

        $token = Auth::attempt($credentials);
        if (!$token) {
            return response()->json([
                'status' => 'error',
                'message' => 'Unauthorized',
            ], 401);
        }

        $user = Auth::user();
        return response()->json([
                'status' => 'success',
                'user' => $user,
                'authorisation' => [
                    'token' => $token,
                    'type' => 'bearer',
                ]
            ]);

    }

    public function register(Request $request){
        $request->validate([
            'name' => 'required|string|max:255',
            'email' => 'required|string|email|max:255|unique:users',
            'password' => 'required|string|min:6',
        ]);

        $user = User::create([
            'name' => $request->name,
            'email' => $request->email,
            'password' => Hash::make($request->password),
        ]);

        $token = Auth::login($user);
        return response()->json([
            'status' => 'success',
            'message' => 'User created successfully',
            'user' => $user,
            'authorisation' => [
                'token' => $token,
                'type' => 'bearer',
            ]
        ]);
    }

    public function logout()
    {
        Auth::logout();
        return response()->json([
            'status' => 'success',
            'message' => 'Successfully logged out',
        ]);
    }

    public function refresh()
    {
        return response()->json([
            'status' => 'success',
            'user' => Auth::user(),
            'authorisation' => [
                'token' => Auth::refresh(),
                'type' => 'bearer',
            ]
        ]);
    }

}
Here’s a quick explanation of the public functions in the
AuthController:
constructor: We establish this function in ourcontrollerclass so that we can use theauth:apimiddleware within it to block unauthenticated access to certain methods within the controllerlogin: This method authenticates a user with their email and password. When a user is successfully authenticated, theAuthfacadeattempt()method returns the JWT token. The generated token is retrieved and returned as JSON with the user objectregister: This method creates the user record and logs in the user with token generationslogout: This method invalidates the userAuthtokenrefresh: This method invalidates the userAuthtoken and generates a new tokenWe’re done with setting up our JWT authentication!
If that’s all you’re here for, you can skip to the test application section.
But, for the love of Laravel, let’s add a simple todo feature to our project!
Create the todo model, controller, and migration
We’ll create the
Todomodel, controller, and migration all at once with the following command:php artisan make:model Todo -mcModify the todo migration
Next, go to the
database/migrations/….create_todos_table.phpfile, and replace the content with the following code:
use Illuminate\Database\Migrations\Migration;
use Illuminate\Database\Schema\Blueprint;
use Illuminate\Support\Facades\Schema;

return new class extends Migration
{
    /**
     * Run the migrations.
     *
     * @return void
     */
    public function up()
    {
        Schema::create('todos', function (Blueprint $table) {
            $table->id();
            $table->string('title');
            $table->string('description');
            $table->timestamps();
        });
    }

    /**
     * Reverse the migrations.
     *
     * @return void
     */
    public function down()
    {
        Schema::dropIfExists('todos');
    }
};
Modify the todo model
Now, navigate to the
app/Models/Todo.phpfile, and replace the content with the following code.namespace App\Models; use Illuminate\Database\Eloquent\Factories\HasFactory; use Illuminate\Database\Eloquent\Model; class Todo extends Model { use HasFactory; protected $fillable = ['title', 'description']; }Modify the todo controller
Next, go to the
app/Http/Controllers/TodoController.phpfile, and replace the content with the following code:namespace App\Http\Controllers; use Illuminate\Http\Request; use App\Models\Todo; class TodoController extends Controller { public function __construct() { $this->middleware('auth:api'); } public function index() { $todos = Todo::all(); return response()->json([ 'status' => 'success', 'todos' => $todos, ]); } public function store(Request $request) { $request->validate([ 'title' => 'required|string|max:255', 'description' => 'required|string|max:255', ]); $todo = Todo::create([ 'title' => $request->title, 'description' => $request->description, ]); return response()->json([ 'status' => 'success', 'message' => 'Todo created successfully', 'todo' => $todo, ]); } public function show($id) { $todo = Todo::find($id); return response()->json([ 'status' => 'success', 'todo' => $todo, ]); } public function update(Request $request, $id) { $request->validate([ 'title' => 'required|string|max:255', 'description' => 'required|string|max:255', ]); $todo = Todo::find($id); $todo->title = $request->title; $todo->description = $request->description; $todo->save(); return response()->json([ 'status' => 'success', 'message' => 'Todo updated successfully', 'todo' => $todo, ]); } public function destroy($id) { $todo = Todo::find($id); $todo->delete(); return response()->json([ 'status' => 'success', 'message' => 'Todo deleted successfully', 'todo' => $todo, ]); } }Add the API routes
To access our newly created methods we need to define our API routes.
Navigate to the
routes/api.phpfile, and replace the content with the following code:use Illuminate\Http\Request; use Illuminate\Support\Facades\Route; use App\Http\Controllers\AuthController; use App\Http\Controllers\TodoController; Route::controller(AuthController::class)->group(function () { Route::post('login', 'login'); Route::post('register', 'register'); Route::post('logout', 'logout'); Route::post('refresh', 'refresh'); }); Route::controller(TodoController::class)->group(function () { Route::get('todos', 'index'); Route::post('todo', 'store'); Route::get('todo/{id}', 'show'); Route::put('todo/{id}', 'update'); Route::delete('todo/{id}', 'destroy'); });In the above code, we’re using Laravel 9 syntax. You’ll need to declare your route the normal way if you’re using lower versions of Laravel.
Test the application
Before we move to Postman and start testing the API endpoints, we need to start our Laravel application.
Run the below command to start the Laravel application:
php artisan serveRegister the API
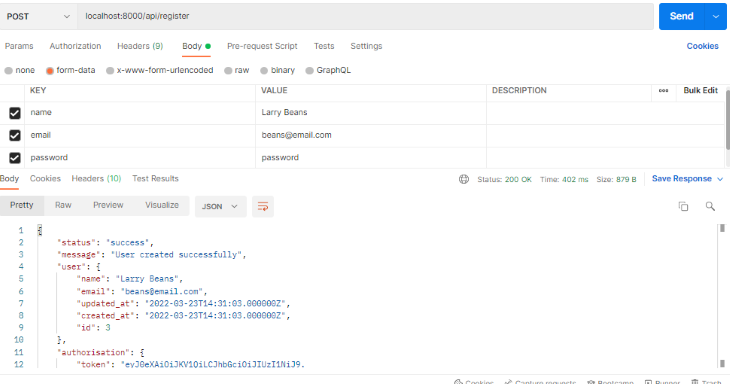
To start the Postman application, add the registration API in the address bar, select the POST HTTP request method from the dropdown, choose the form-data option on the Body tab and select the name, email, and password input fields.
Then, click Send to see the server response.
Share:
0 Comments
Leave a reply